

How to Patch Drywall: A Complete DIY Guide
A doorknob punched through the wall. A moving company scraped a corner. A towel bar pulled loose and left a crater behind. That’s usually when people start searching how to patch drywall, especially if a paint touch-up, move-out walk-through, or post-remodel cleanup is coming up fast.
Most wall damage in Reno and Sparks is fixable with basic tools, patience, and the right method for the hole size. The repair itself isn’t usually the hard part. The hard part is getting a patch flat, crack-free, and clean in our dry high-desert air, then dealing with the fine white dust that settles everywhere.
Your Guide to Flawless Drywall Repairs in Reno
Small drywall damage has a way of looking worse than it is. A popped anchor near the entry, a dent from furniture, or a fist-sized hole in a bedroom wall can make the whole room feel unfinished. The good news is that most of these repairs are manageable if you stay within the right lane and don’t overbuild a simple patch.
For homeowners and property managers, this is one of those skills that pays off right away. A clean patch helps during move-out inspections, freshens up a room before listing photos, and keeps minor damage from turning into a bigger cosmetic issue later.
There’s also a practical money angle. The global drywall repair market is valued at about $0.53 billion in 2026, and small DIY repairs can cost as little as $20 to $50 in materials, while professional work can average $50 to $80 per square foot according to drywall repair market data from Business Research Insights. That gap is why so many people handle nail pops, dents, and small holes themselves.
What makes Reno repairs a little different
Reno homes add one extra wrinkle. The dry air and elevation can make joint compound skin over fast. That sounds helpful until the mud starts dragging under your knife, flashing differently under paint, or shrinking enough to show the patch outline later.
Local reality: A patch that looks good wet can still dry rough in Reno if the compound sets too fast and you rush the next coat.
That doesn’t mean the repair is harder. It means thin coats, clean edges, and dust control matter more here than they might in a milder climate.
A simple way to think about it
Most repairs fall into three buckets:
- Tiny damage like nail holes, dings, and shallow dents
- Small to medium holes where a California patch works well
- Large openings that need wood backing and a real drywall insert
Choose the method by hole size, not by what material you already have on the shelf. That’s where a lot of bad patches start.
Gathering Your Tools and Prepping the Area
You can usually tell how a drywall patch will turn out before the first coat goes on. If the floor is bare, the wall face is dusty, and the compound tub has been sitting open in Reno’s dry air, the repair already got harder than it needed to be.
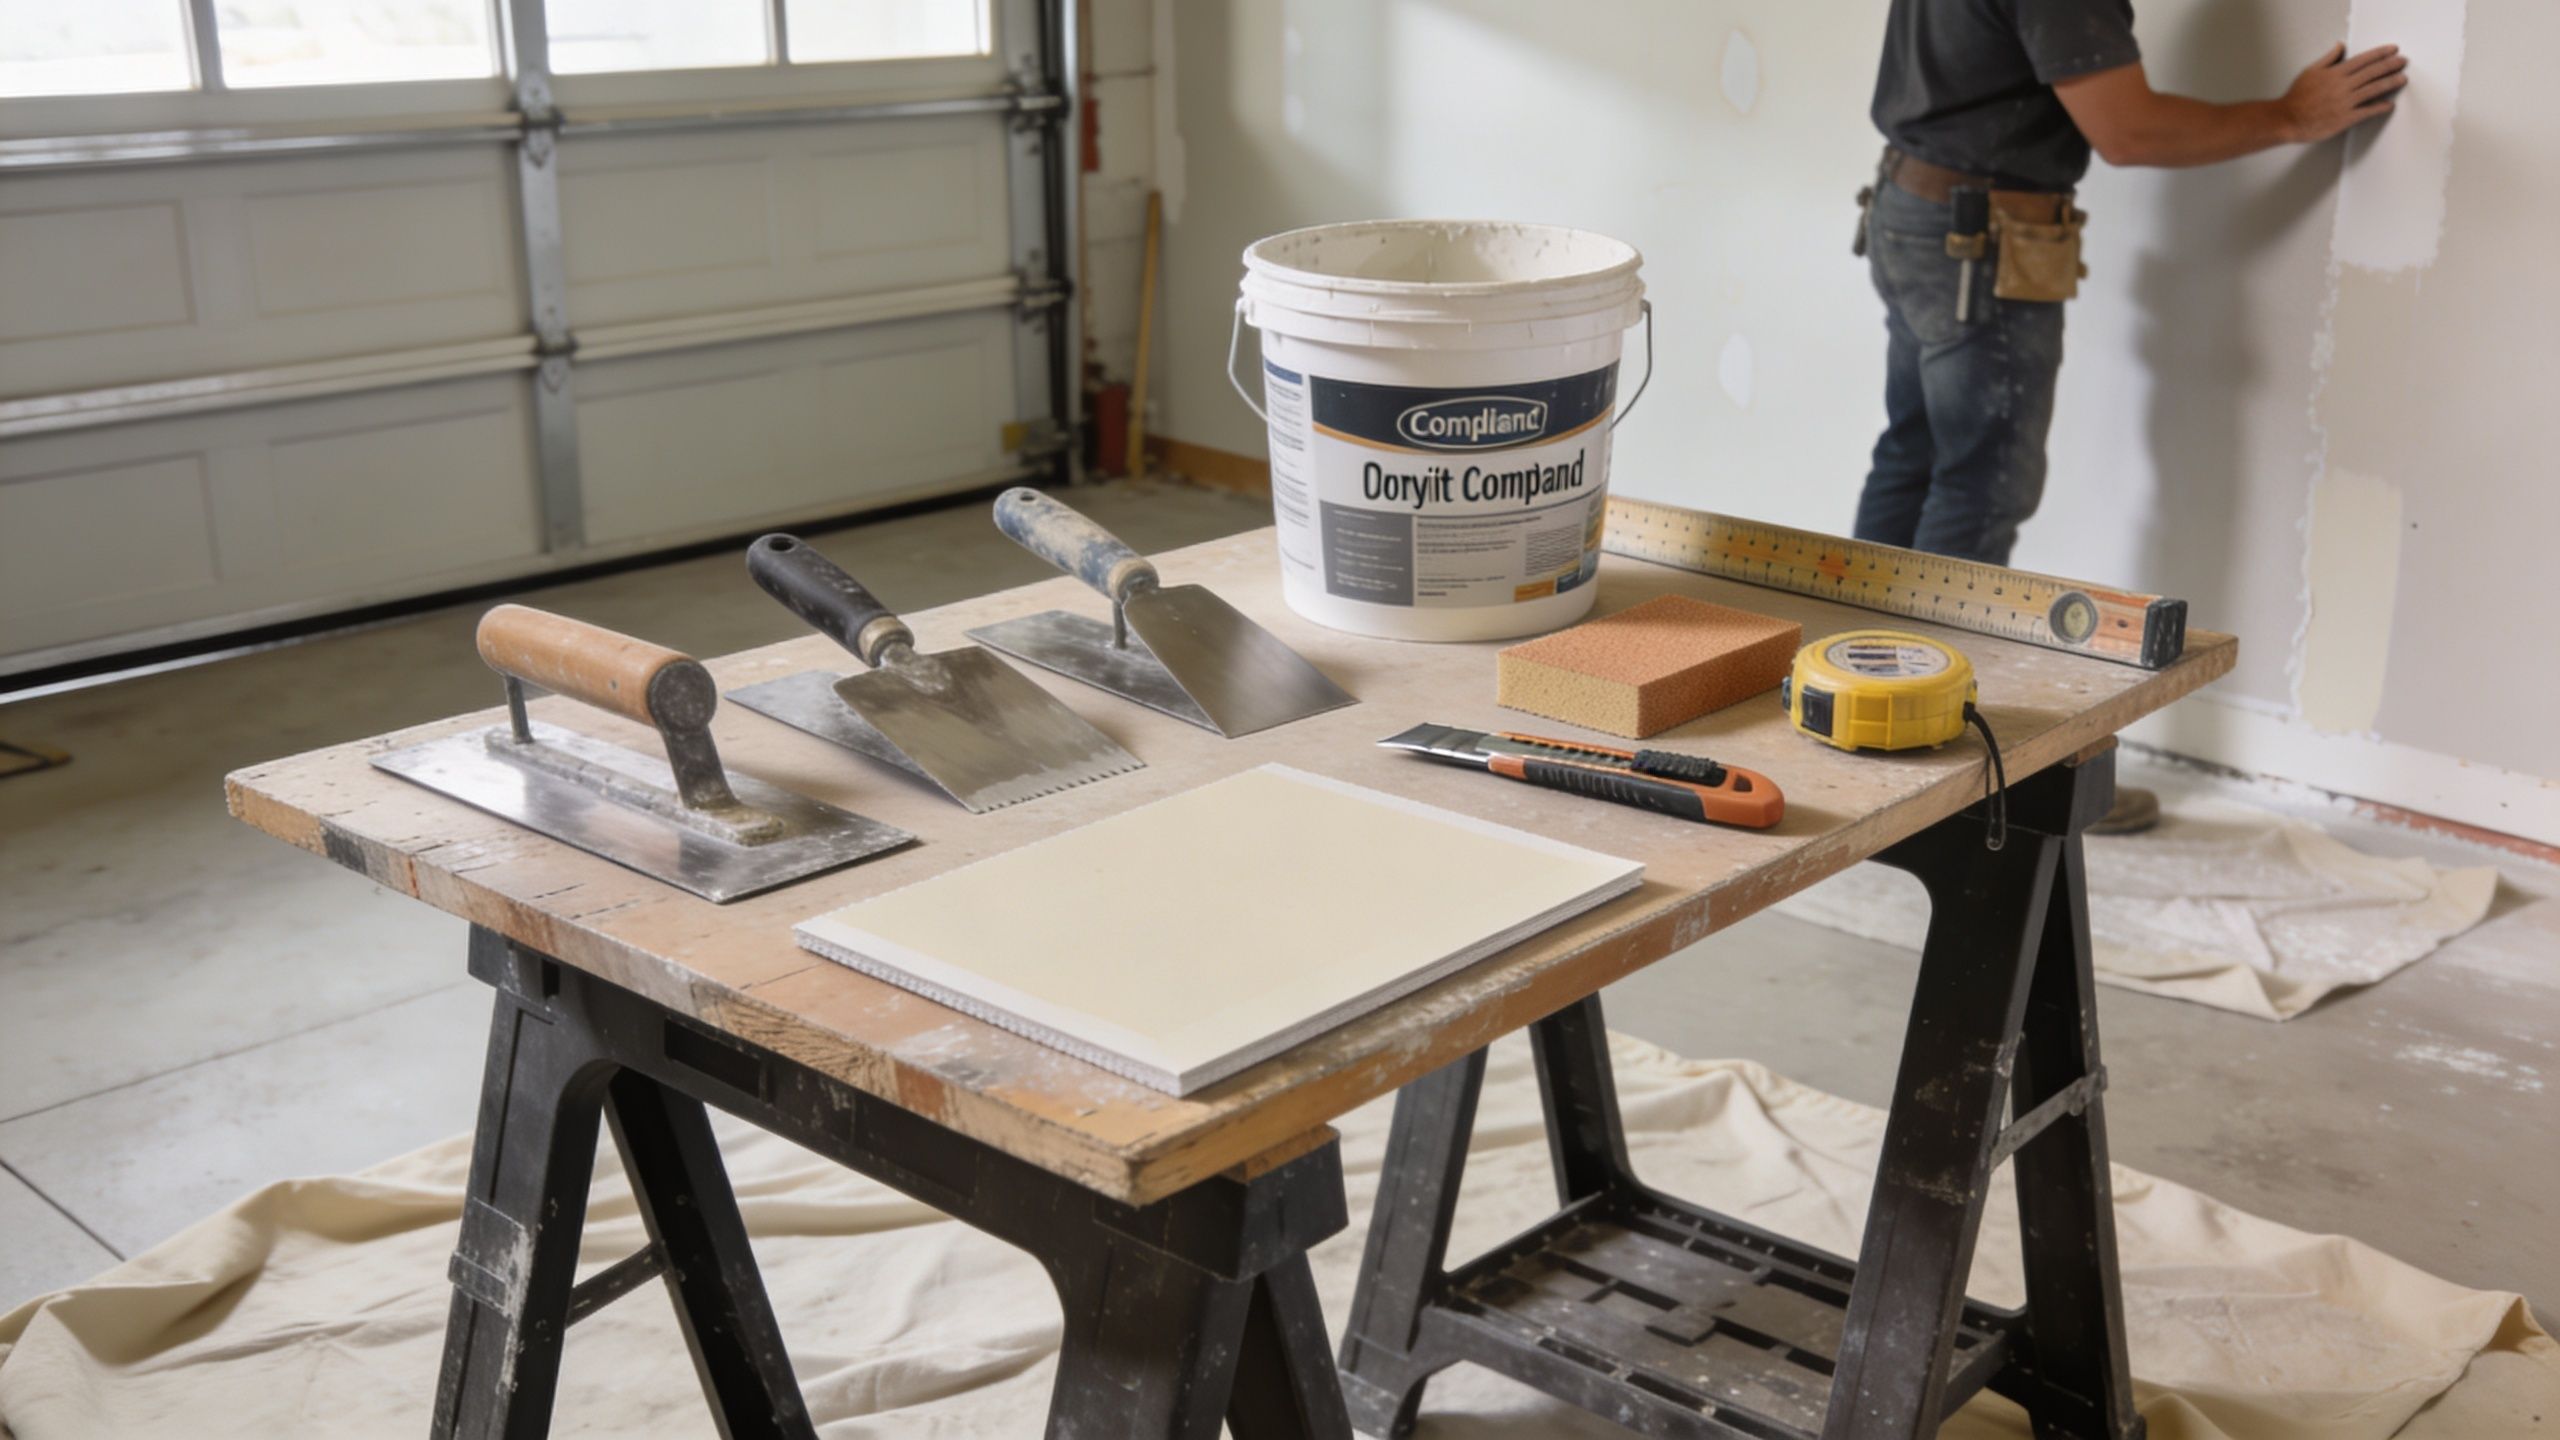
The core kit
Set your tools out by task before you cut anything. That keeps you from walking back and forth with dusty hands, and it helps you catch missing items before the wall is open.
- Cutting tools for shaping the damaged area. A sharp utility knife gives you cleaner scores on small patches. A jab saw helps with rough openings and corners.
- Patching materials for the repair itself. Depending on the hole, that could be scrap drywall, a patch kit, self-adhesive mesh tape, paper tape, or wood furring strips.
- Finishing tools for blending the patch into the wall. Keep a 6-inch knife, sanding sponge, sandpaper, primer, and matching paint within reach.
The exact mud matters in Reno. All-purpose joint compound gives you more working time, which helps on finish coats. Quick-set saves time, but in our high-desert air it can tighten up fast, especially if you mix a small batch too dry or pause too long between passes.
Match the method to the hole
Trying to force one repair method onto every wall problem is a common starting point for a bad patch.
| Hole Size | Recommended Method | Key Materials |
|---|---|---|
| Tiny dents and nail holes | Fill and sand | Spackle or joint compound, putty knife, sandpaper |
| Small to medium holes | California patch | Drywall scrap, joint compound, knife, sanding sponge |
| Large holes | Backed patch | Drywall piece, wood backing, screws, mesh tape, joint compound |
Keep a scrap piece of drywall if you can. It gives you better results than relying on a generic patch for every repair, and it helps you practice your knife angle before you touch the wall.
Prep the room like cleanup is part of the repair
Drywall work is messy in a hurry. Fine dust gets into baseboards, return vents, carpet edges, and window tracks, and Reno wind can push that dust through the room if you leave windows open during sanding.
Start with a drop cloth or rosin paper. Move lightweight furniture out of the work zone. Cover nearby upholstery, and pop off vent covers if the repair is close to HVAC returns. Vacuum the damaged area and wipe the wall face so your mud bonds to drywall, not dust. If you want a cleaner setup from the start, review these construction dust cleanup tools and vacuum considerations before opening the compound.
Covering the floor first saves more cleanup time than any shortcut you take on the patch itself.
That last part matters. A wall repair is not really done until the room feels clean again, not chalky underfoot and not dusty along the trim.
Tool choices that actually change the result
Some trade-offs are worth knowing before you begin:
- All-purpose mud stays workable longer and is easier for beginners to spread thin.
- Quick-set compound helps with deeper fills, but it gives you less margin for slow knife work.
- Mesh tape is handy on supported patches, though it needs enough compound to hide the pattern.
- Paper-faced patches usually disappear better on smaller repairs if the wall around them is still solid.
- A sanding sponge gives you more control around patch edges than folded sandpaper.
If the wall has texture, get that material ready before patching. In Reno, dry compound can flash and shrink enough to show every rushed step once primer hits it. A careful setup keeps the repair smoother, cuts down on dust, and makes the final cleanup a lot easier.
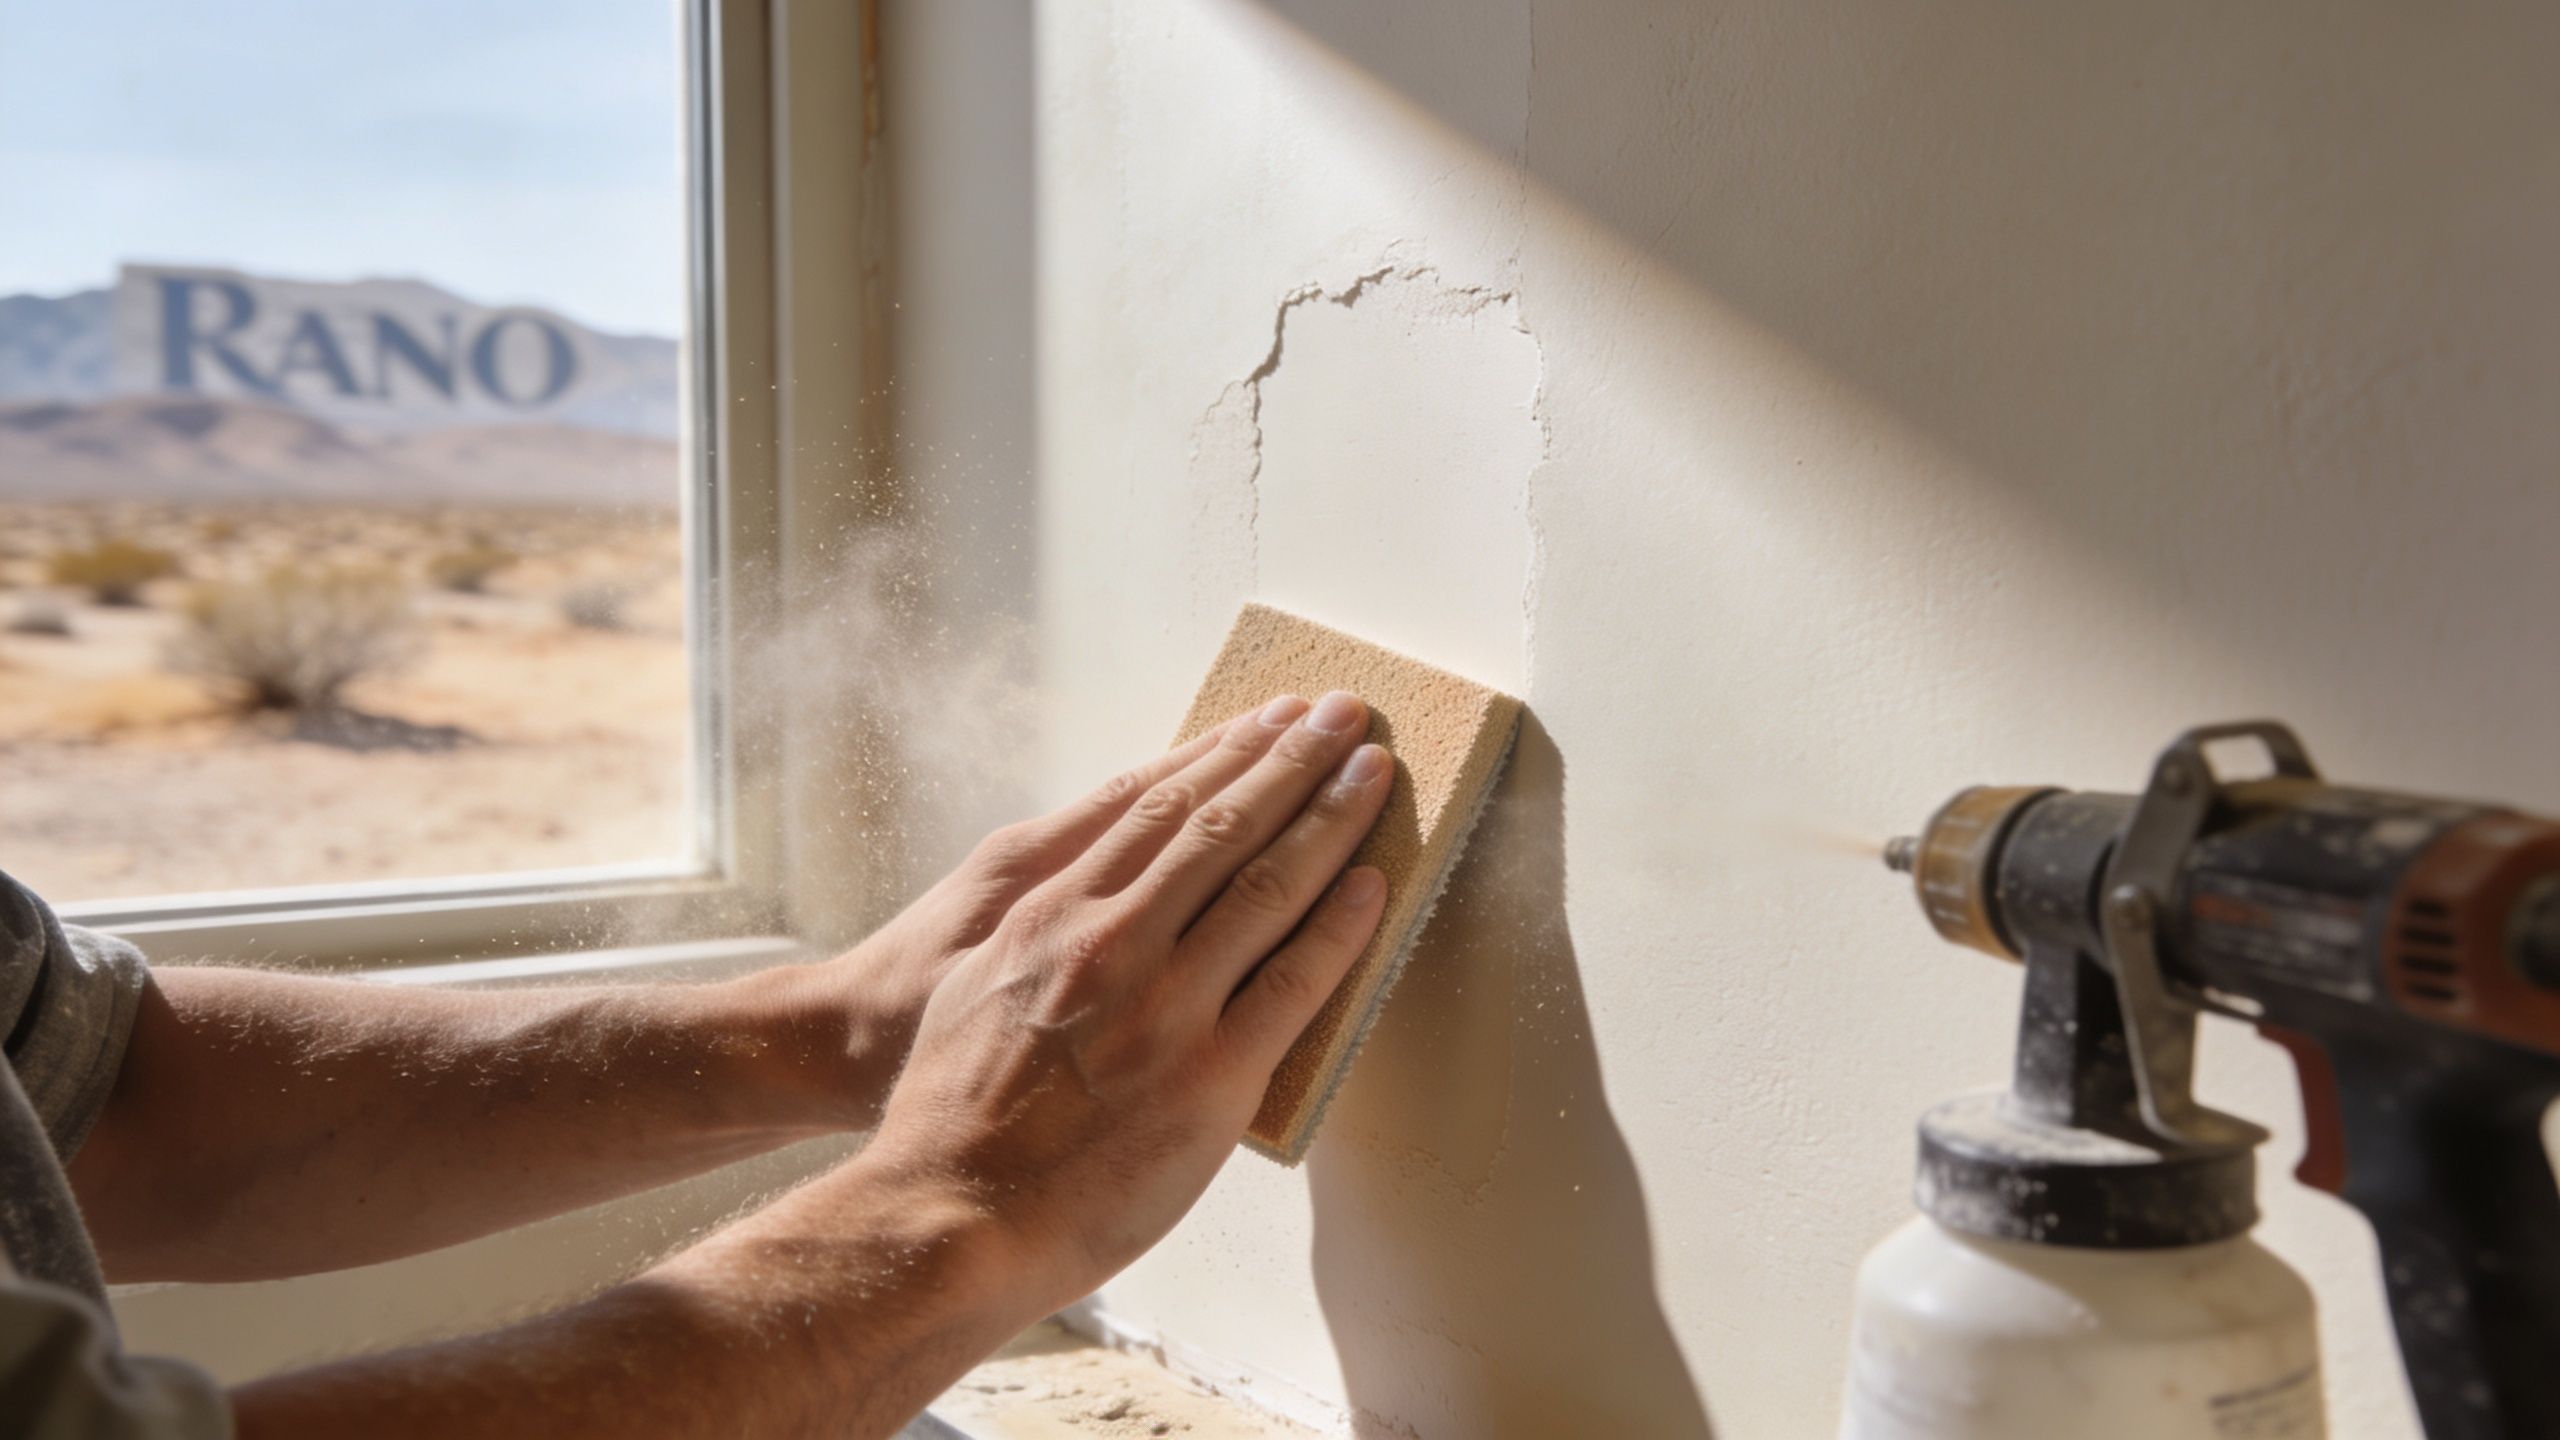
Repairing Small Holes and Dents Like a Pro
For the usual bedroom, hallway, or living room wall damage, the California patch is one of the cleanest fixes you can use. It works especially well on holes up to 8x8 inches, and DIY benchmarks cited by The DIY Playbook report a 95%+ first-time success rate for undetectable blends on smooth walls. The big advantage is simple. The patch uses its own paper flange for adhesion, so you don’t need tape.
Best use cases
This method shines on:
- Doorknob holes in interior walls
- Anchor pull-outs from shelving or towel bars
- Medium cosmetic damage where the drywall around the hole is still solid
If the wall is crushed, soft from moisture, or badly cracked around the opening, stop and move to a structurally supported patch instead.
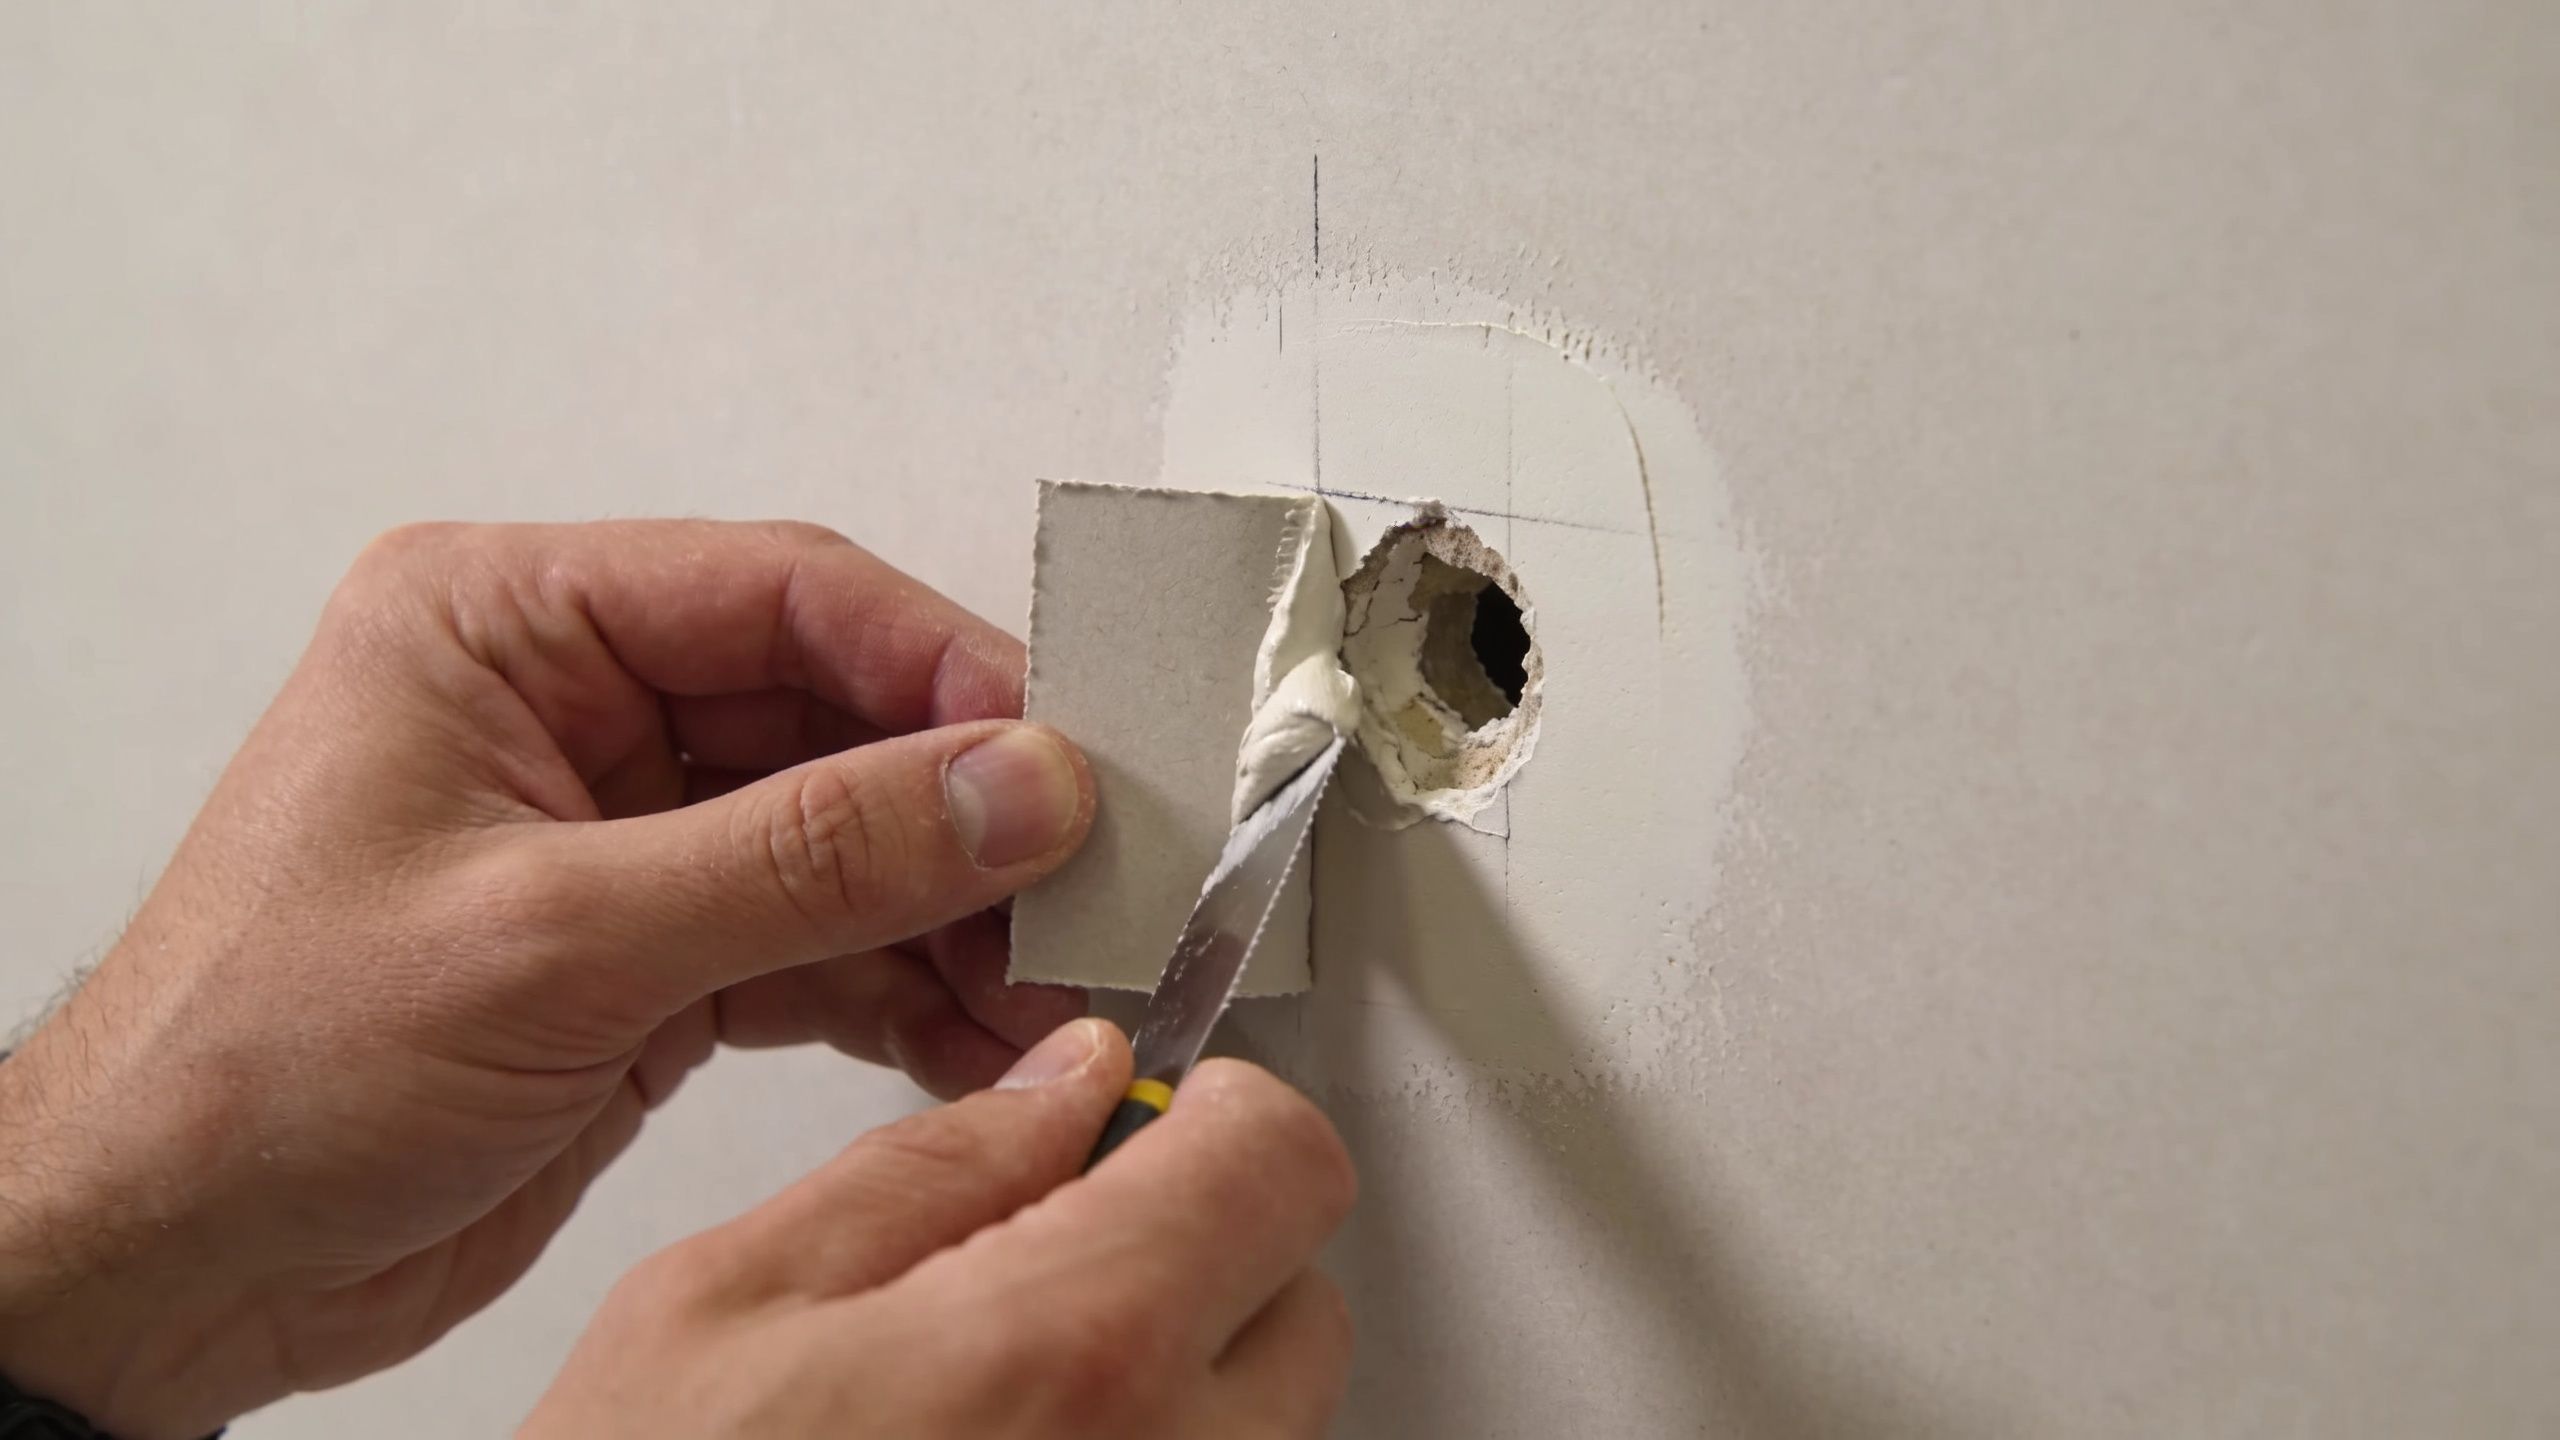
How to cut and fit the patch
Start by trimming the damaged area into a neat square or rectangle. Clean edges matter because they let the patch sit flat instead of rocking on torn paper.
Then cut a drywall piece slightly larger than the opening. Peel back the gypsum around the perimeter so the front paper remains as a flange. That paper border is what bonds the patch to the wall face.
A good patch should sit in the opening with the paper lying flat on the wall. If it bows, trim it. If it rattles around, cut a new one.
Practical rule: Fit the drywall core to the hole first. The paper flange only works if the center piece sits where it belongs.
Mudding without creating a hump
Spread a solid coat of joint compound on the wall around the opening and on the back of the paper flange. Press the patch in place, then smooth it with your knife so the paper beds into the mud.
After that, feather joint compound beyond the patch edges. Keep the first coat controlled. Too much mud turns a nice repair into a wide hump that takes forever to sand flat.
For cleaner results after sanding, this guide on the best way to remove drywall dust is worth a look before you start your finish work.
A quick visual helps if you’ve never cut one before:
What usually goes wrong
Most failed small patches come from one of three mistakes:
- The hole wasn’t squared up, so the patch never sat flush.
- The first coat was too thin to bond the paper properly.
- The finisher sanded hard in the middle and lifted the paper edge.
Let each coat dry fully, then sand lightly. You’re shaping the mud, not grinding through the repair. Two or three thin coats usually look better than one heavy application.
Tackling Large Drywall Holes with Structural Support
Once the hole gets beyond a simple face patch, the repair has to carry itself. For such repairs, backing is critical. For large holes over 8x8 inches, field stats cited in Instructables say adding a wood backing strip can bring durability up to 98%, while amateur repairs without backing show a 60% failure rate from sagging within one year.
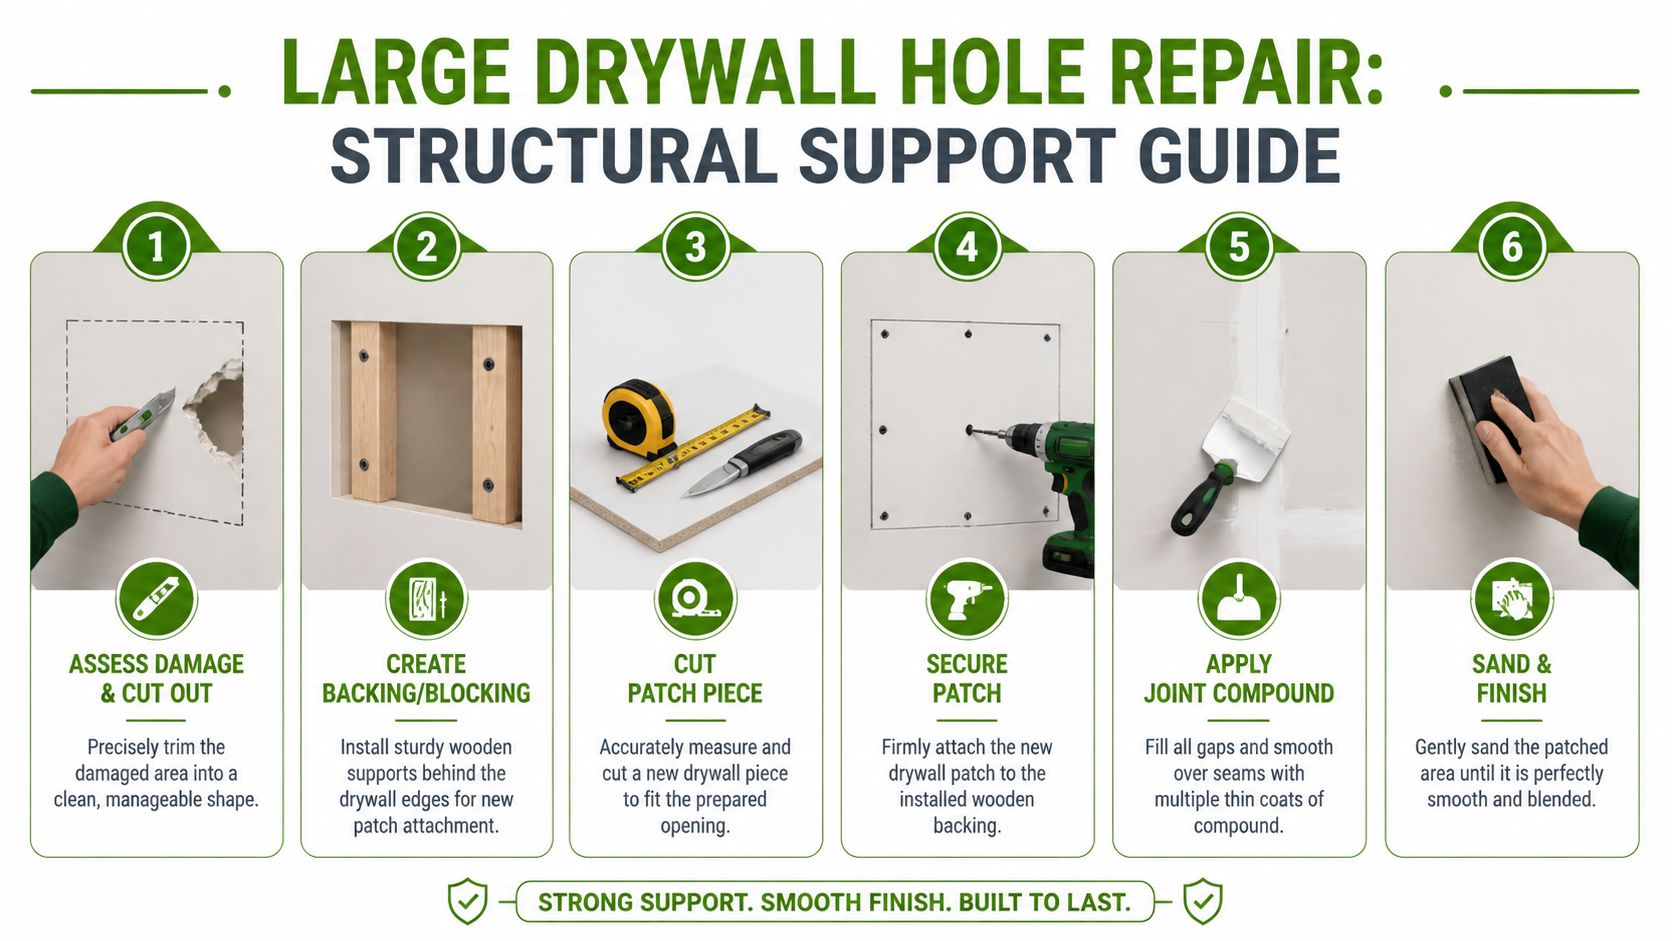
Cut back to sound material
Don’t try to save ragged drywall. Cut the opening into a clean rectangle so your patch has square edges and predictable support.
Use a stud finder first. If you can catch a stud, great. If not, furring strips do the job well.
The support step that matters most
Slide wood backing behind the existing drywall and fasten it securely. Then screw the new drywall patch into that backing.
A few details make a difference:
- Match thickness to the existing wall
- Set screws carefully so the head dimples the paper slightly without tearing it
- Keep edges clean before taping and mudding
If the hole came from a leak or there’s staining, softness, or odor in the wall cavity, deal with that first. A cosmetic patch over compromised material doesn’t hold up. If moisture is part of the story, it also helps to understand when damaged sheetrock points to a mold issue.
No backing means the patch is floating. A floating patch might look fine after paint, but it often tells on itself later.
Finishing the seams
Once the patch is screwed in place, tape the seams and build them out with multiple thin coats of compound. Keep each coat wider than the last so the repair blends into the field of the wall instead of creating a boxed outline.
Large repairs reward patience. If you rush the second coat over a damp first coat, the knife drags, the tape shifts, or the finish shrinks unevenly later.
Where people overcomplicate it
Large drywall repairs don’t need fancy tricks. They need a clean opening, solid backing, a correctly sized patch, and controlled mud work. People usually get in trouble when they skip support, over-tighten screws, or try to finish the whole thing with one thick coat.
If the damage is on a ceiling or tied to major water intrusion, that’s where calling a drywall pro usually makes more sense than forcing a DIY fix.
Achieving an Invisible Finish in Reno's Dry Climate
A solid patch can still look obvious if the finish work is rushed. The last part of how to patch drywall is often the standout. Feathering, sanding, priming, and texture matching decide whether the wall disappears or keeps catching your eye every time the light hits it.
Why Reno changes the finish
Reno sits at roughly 4,500 feet, and in that kind of high-altitude environment standard joint compound can dry too quickly and raise the risk of cracking. According to high-altitude drywall patching guidance from Aquor Water Systems, pros often use acrylic-based compounds or add a latex-based retarder to extend working time by 30% to 50% and reduce shrinkage.
That lines up with what a lot of local homeowners notice. Mud can skin over before it has time to level, especially near sunny windows or HVAC airflow.
Feather wider than you think
The fix is usually simple. Apply thin coats and widen each pass. The center covers the seam. The outer edges do the hiding.
A practical sequence looks like this:
- First coat beds the patch or tape and fills the low spot
- Second coat extends wider and starts flattening the transition
- Third coat skims lightly to erase knife marks and minor ridges
If you try to build thickness instead of width, the patch flashes under paint.
Thin mud dries cleaner in the high desert. Heavy mud shrinks, drags, and leaves more sanding than most people expect.
Sanding and texture matching
Use a sanding sponge or fine paper and let the tool do the work. Pressing hard creates flat spots around the repair and exposes tape edges.
For common orange peel or light splatter texture, practice on cardboard first. A patch can be flat and still stand out if the surrounding wall has texture. Prime before paint so the repaired area doesn’t absorb paint differently from the existing wall.
A few Reno-specific habits that help
- Keep materials inside first so they aren’t starting cold or overheated from a garage
- Avoid direct airflow from fans or vents on a fresh patch
- Watch sunny walls because they dry faster than shaded ones
- Don’t chase perfection in one pass when another thin coat will do it better
That’s the difference between a patched wall and a repair nobody notices.
The Final Step From Dusty to Spotless
You finish sanding, the patch looks good, and ten minutes later there is white powder on the baseboards, in the window tracks, and on the shelf across the room. That happens all the time with drywall work in Reno. Our air is dry, houses already collect fine desert dust, and drywall powder likes to hang around in all the same places.
A clean repair takes two jobs. Fix the wall. Then remove the dust well enough that the room feels normal again.
Drywall dust travels farther than people expect. It settles into flooring seams, trim edges, vents, blinds, and furniture surfaces. If you only wipe what you can see, the room still feels gritty, and that dust often shows back up after the next breeze, the next HVAC cycle, or a sunny afternoon warming the window area.
The best routine is simple. Keep dust contained during sanding, vacuum with a brush attachment instead of sweeping, then clean from top to bottom so you are not dropping dust onto surfaces you already finished. If the patch was part of a remodel, turnover, or move-out, a more detailed post-construction cleaning process usually makes the difference between "good enough" and completely spotless.
Some repairs also stop being a smart DIY project. A small nail pop or doorknob hole is one thing. Ceiling patches, water-damaged drywall, soft framing, mold concerns, or a wall that still flashes under side lighting can eat up a lot of time and still look patched when the paint dries.
I tell homeowners to judge the whole result, not just the hole itself. If the repair is sound, the texture blends, the paint lays evenly, and the room is clean enough that you are not finding white dust on shelves days later, the job is done.
If you’ve finished a drywall repair and need the home cleaned up the right way, book with Altitude Cleaning Crew for post construction cleaning Reno NV. Call 775-376-5527 or book online at Altitude Cleaning Crew online booking.
Flat-Rate House Cleaning Services You Can Count On
From downtown Reno apartments to family homes across Sparks, our team delivers reliable, professional house cleaning you can count on.
