How to Clean a Cheese Grater The Right Way

TLDR: If you need deep cleaning Reno NV, this is for homeowners and property managers who want a kitchen that feels fully reset, not just surface-clean. This guide shows how to clean a cheese grater properly, then helps you decide when it makes more sense to book a full professional kitchen clean in Reno or Sparks.
If you are dealing with dried cheese in tiny blades, sticky kitchen buildup, and the rest of the house starting to pile on, you are in the right place. A spotless grater is nice. A spotless kitchen, floors, baseboards, and bathrooms is a significant win.
That Stubborn, Cheesy Mess We All Know
A cheese grater has a talent for looking harmless until cleanup starts. You grate cheddar for tacos, parmesan for pasta, set the grater in the sink, and an hour later the cheese has glued itself into every tiny opening.
That is why so many people search for how to clean a cheese grater after dinner, not before. The job is awkward, easy to put off, and annoyingly sharp.

In Reno and Sparks, little chores tend to stack fast. A busy week, desert dust at the windows, pollen working its way inside, and a packed weekend can turn one dirty kitchen tool into a full kitchen reset.
A clean home comes down to these details. The grater in the sink, the grease film near the stove, the crumbs under the toaster, the dust riding in from outside. If you are already comparing options for deep cleaning Reno NV, this is usually the point. You are not looking for one more hack. You want the kitchen handled right.
Tip: The biggest mistake is letting grated cheese dry overnight. Fresh residue comes off with far less effort than hardened residue.
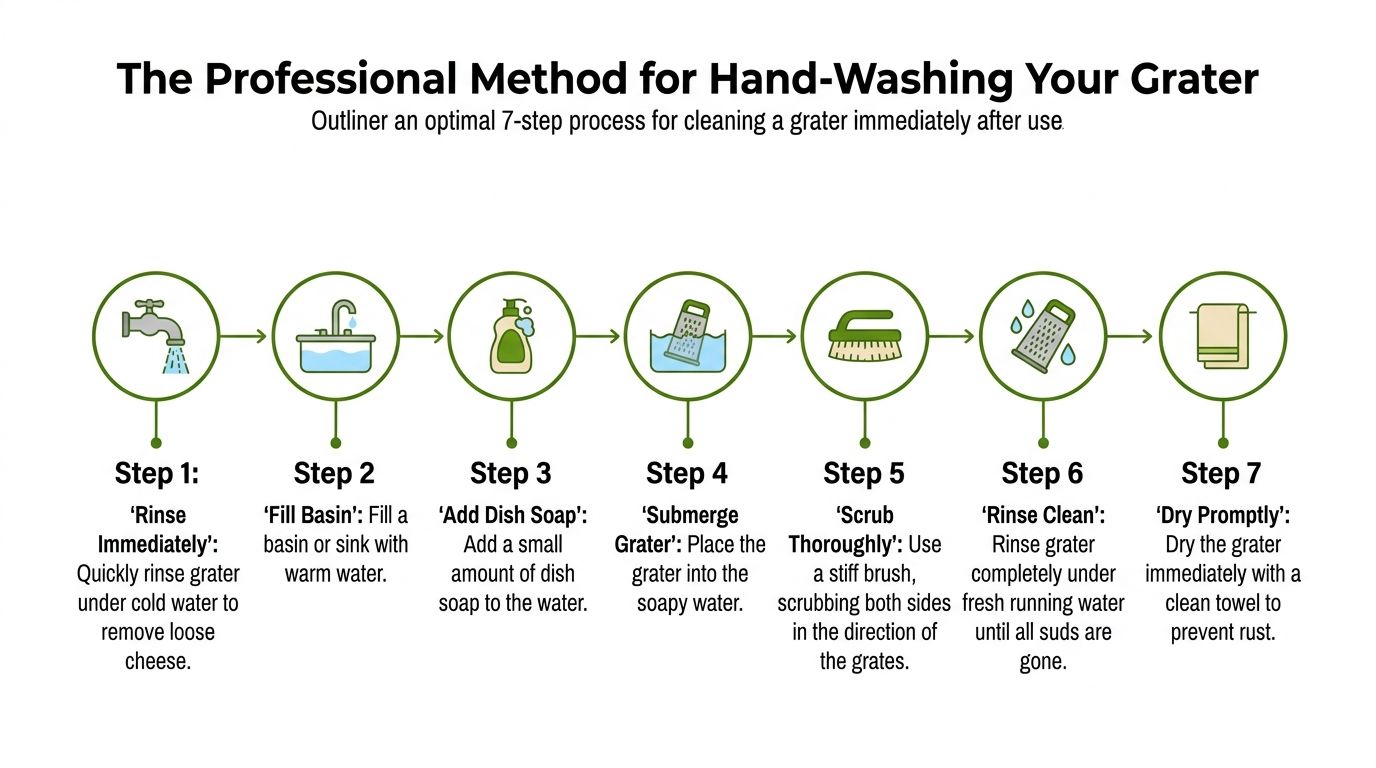
The Professional Method for Hand-Washing Your Grater
A good hand-wash routine saves your fingers, your sponge, and the grater itself. I clean these the same way I handle other awkward kitchen tools. Remove the loose bits first, soften what is stuck, then brush with the grain of the cutting surface instead of attacking it from every angle.
What to use
Keep the setup simple.
- Mild dish soap for a short soak
- Warm water to loosen fresh residue
- Nylon dish brush that can get into the holes without shredding
- Silicone spatula or scraper for heavy clumps
- Clean towel or drying rack for immediate drying
If your kitchen tools are a little random right now, this cleaning supplies list for everyday kitchen upkeep is a practical place to start.
The order that works
Scrape before the grater hits the sink
Pull off the thick cheese stuck to the face and around the base. A spatula edge works well for this. It keeps melted cheese from turning into paste in the sink water.Rinse with warm water
Hold the grater under running water and let the flow push out the easy residue. Fresh cheese usually releases here. Dried cheese will not, and that is fine. The goal is to cut down the mess before soaking.Soak briefly in soapy water
Ten to fifteen minutes is usually enough. Longer is not always better, especially for graters with seams, coatings, or lower-grade metal that can spot if left sitting too long. Commercial cleaning guidance uses the same basic rinse, soak, scrub, rinse, and dry sequence for food-contact tools, and that order holds up well at home too, as outlined in AMPTO's grater cleaning protocol.Brush from the safer side
On a box grater, brush from the inside out whenever you can. On a flat grater or rasp, follow the direction of the teeth. That clears the holes without dragging your knuckles or shredding the brush.Rinse again, then check in the light
Turn the grater so light passes through the openings. If any hole looks cloudy or blocked, there is still food in it. Give those spots another short pass with the brush instead of scrubbing the whole tool again.Dry it right away
Water left around seams, rivets, or the bottom edge is what causes a lot of the spotting people blame on age. Towel-dry first, then let it finish air-drying upright.
Before moving on, this quick demo is useful for coated grater care and gentle handling:
The hygiene part people underestimate
Tiny bits of dairy trapped in the teeth do more than look bad. They hold odor, attract more grime the next time the grater is used, and make the whole tool feel never quite clean.
Hot water helps, but clean contact matters more than extreme heat in a home kitchen. A careful final rinse and complete drying do more for day-to-day sanitation than a rushed wash and a wet trip to the dish rack.
Pro move: If cheese has dried hard in the holes, do a second short soak instead of pressing harder with the brush. Extra force usually means scraped skin, bent teeth, or both.
Techniques for Every Type of Grater
Different graters fail in different ways. Clean them all the same, and you either miss residue or damage the tool.
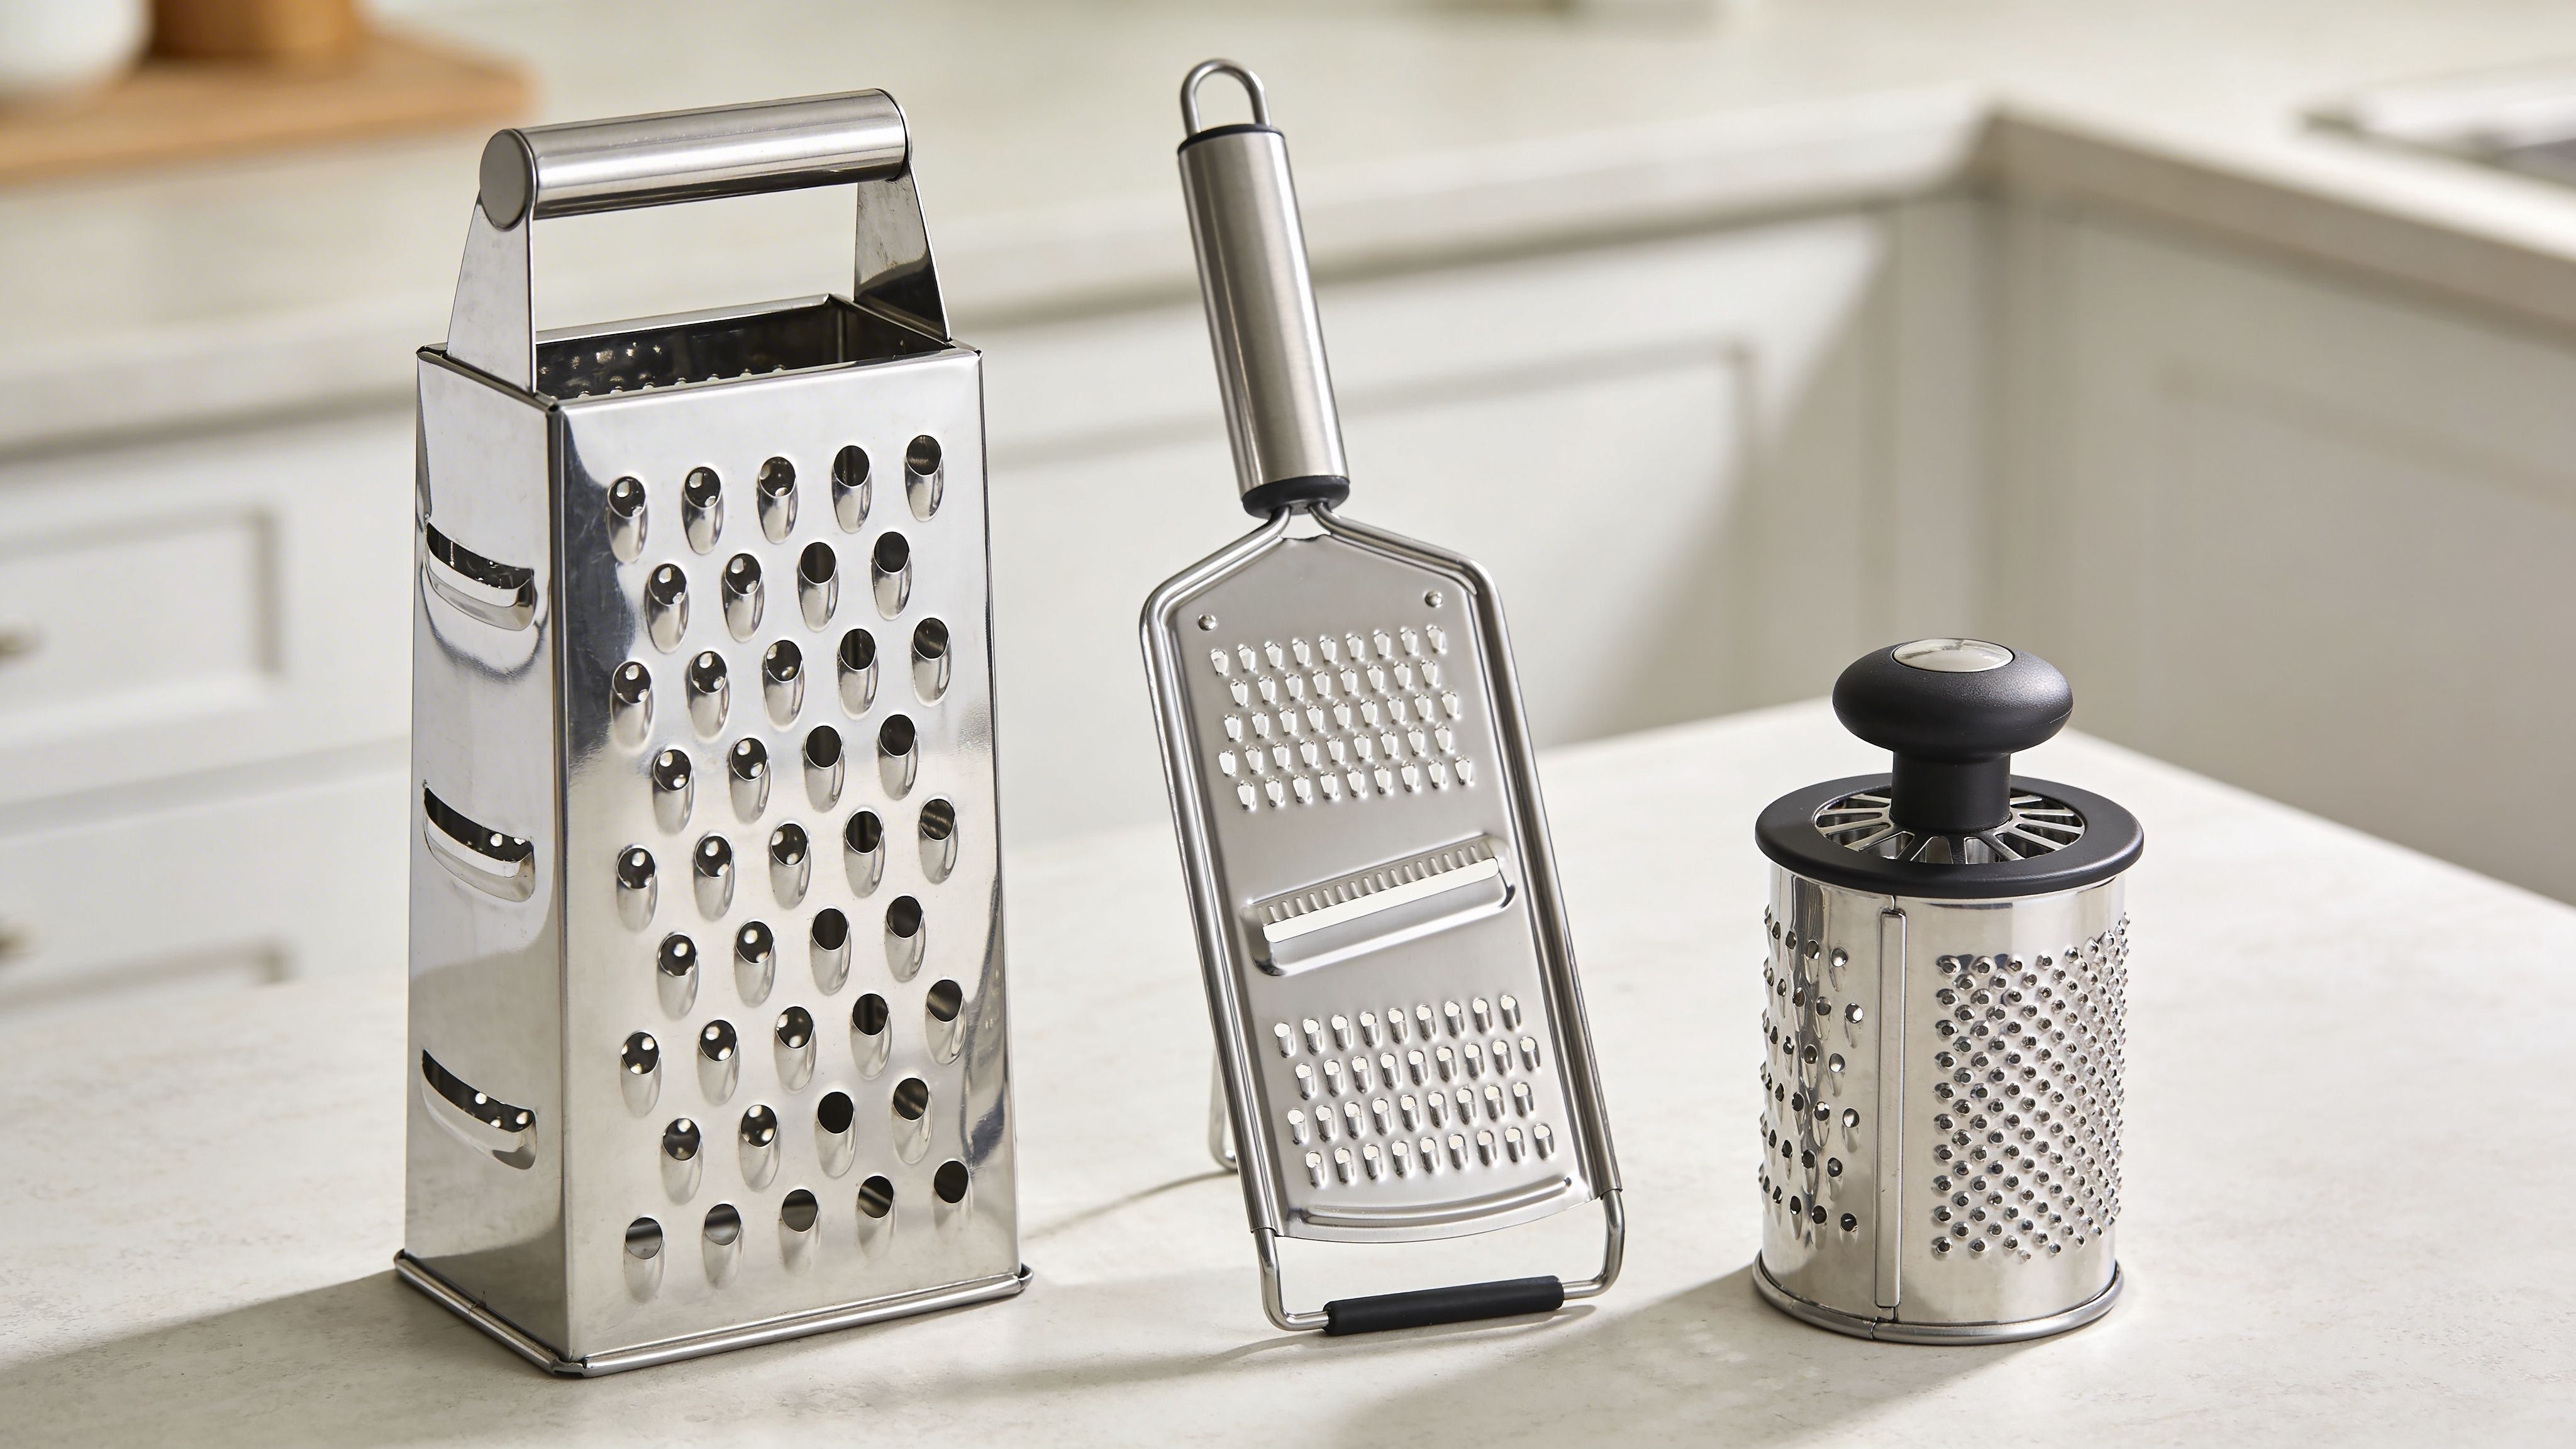
Box graters
These trap cheese on both the outside and the hollow interior. The outer face looks clean first, but the inside corners usually hold onto more residue.
Use a brush that can reach the bottom seam and top handle area. Turn the grater so light hits through the holes. If you cannot see daylight, there is still residue in there.
Microplanes and rasps
These are where people ruin sponges. Never wipe across the teeth with a soft sponge unless you enjoy leaving bits of sponge behind.
Instead, rinse, soak briefly, and use a brush in the same direction as the blades. Short strokes work better than aggressive scrubbing. You want to clear the teeth, not mash residue deeper into them.
Rotary graters
Rotary models need one thing more than anything else. Disassembly. If the drum, handle, and housing separate, take them apart before washing.
Cheese hides around the drum edges and where the crank meets the body. Clean each part individually, then dry each piece before reassembly so moisture does not stay trapped inside.
Non-stick coated graters need special care
Non-stick coated graters need special care. Many guides are weak in addressing this. Existing content often skips coated graters, even though users report coating damage from routine scrubbing. As noted in this video discussing coated grater cleaning issues, major guides often fail to address gentle methods like using a microfiber cloth, which leaves people risking scratched coatings and flaking surfaces.
For coated graters:
- Use mild dish soap
- Choose a microfiber cloth or very soft brush
- Do not use steel wool
- Do not use abrasive powder
- Check whether the manufacturer states it is dishwasher safe
Rule of thumb: If the surface has a coating, clean for preservation, not brute force. Gentle pressure repeated twice is better than one aggressive scrub.
The Dishwasher Debate Is It Safe for Your Grater
Dishwasher safe does not always mean dishwasher ideal.
The dishwasher can help with hot-water cleaning, and for some stainless graters it is perfectly fine. But it also has a downside. Tiny cheese bits can harden further during the cycle, especially if they were not rinsed off first.
When the dishwasher makes sense
Use it when the grater is stainless, the maker allows dishwasher cleaning, and you have already removed visible residue. Place it securely so it does not rattle into other items.
A pre-rinse matters more than people think. Without it, you may open the machine to find clean-looking metal with baked-on flecks still in the teeth. If your dishwasher itself is not running clean, this guide on how to clean a dishwasher filter is worth checking before you rely on it for tools with tight crevices.
When hand-washing is better
Hand-washing wins for:
- Microplanes that catch and hold fine residue
- Rotary graters with multiple parts
- Coated graters that do not like rough handling
- Older graters that show rust at seams or edges
Skip the heated dry cycle if you are trying to avoid baked-on residue or unnecessary wear. Wash, rinse, then dry by hand or let it air-dry completely.
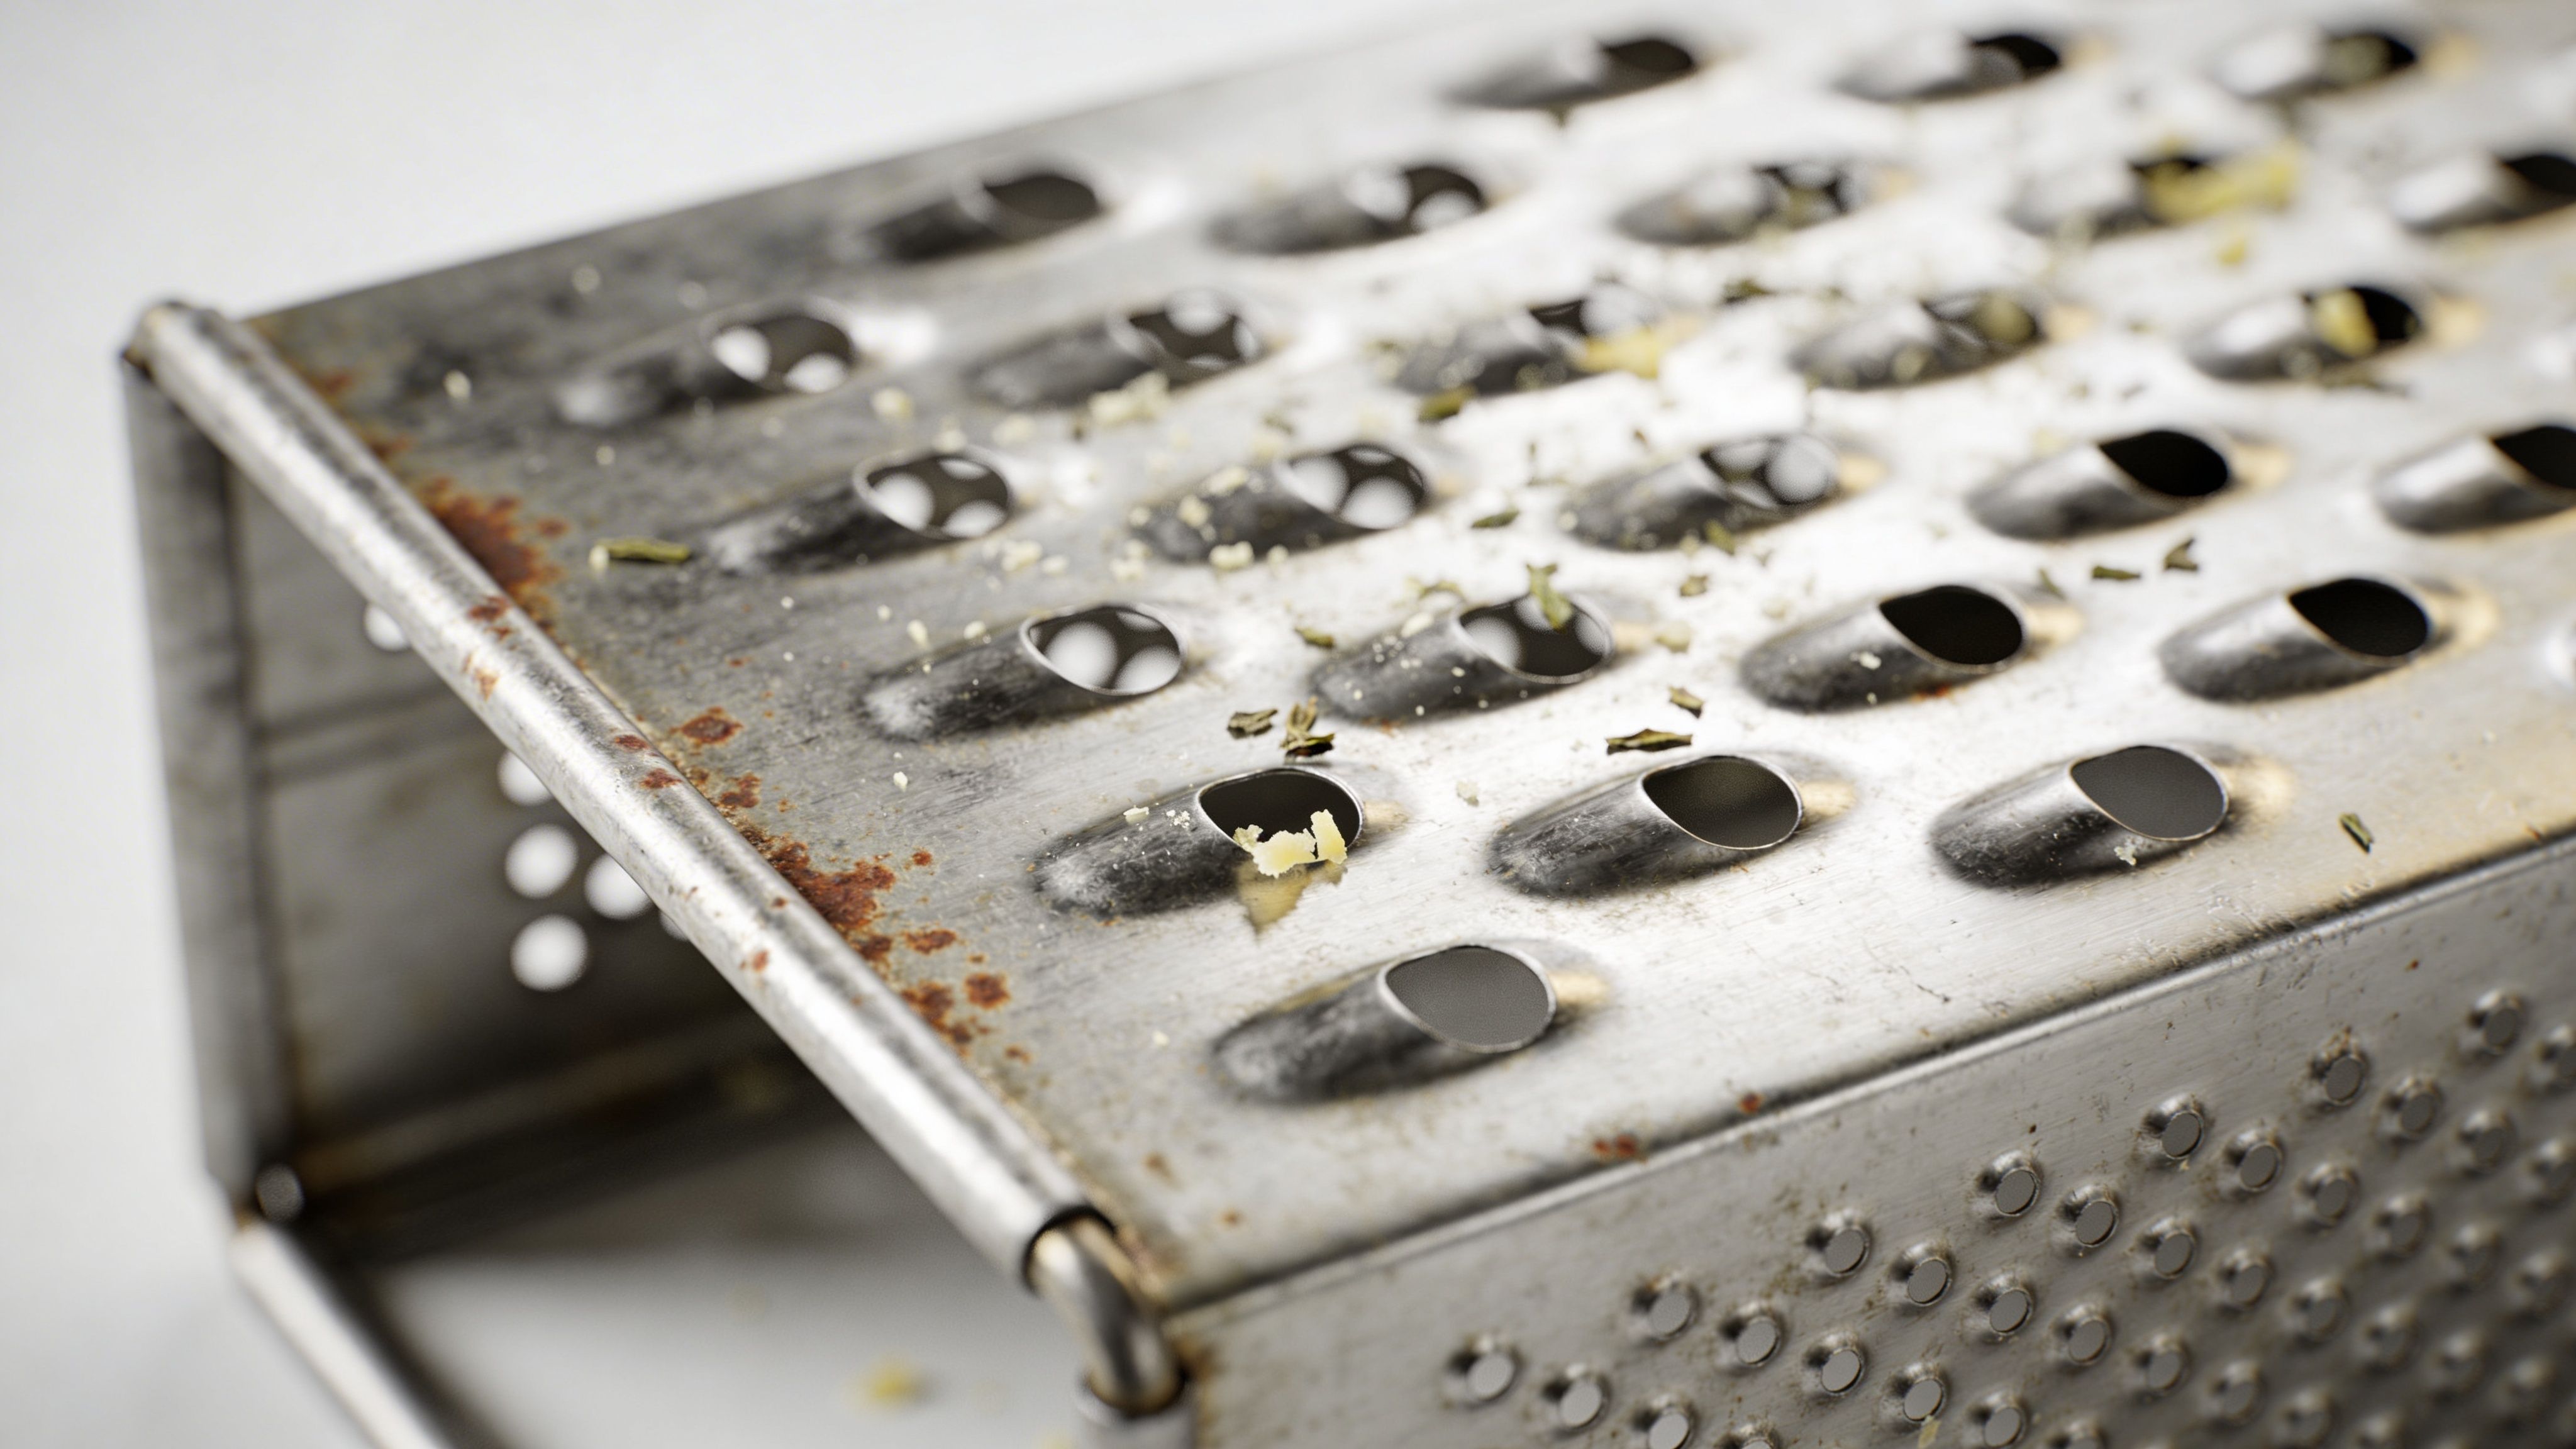
Removing Stubborn Stains Rust and Lingering Odors
For graters that have been neglected, simple cleaning is not enough. Dried cheese, orange rust spots, and that stale dairy smell need a more targeted approach.
If residue is cemented into the teeth, do not start by scraping hard. That is how hands get nicked and coatings wear out. Start with a short soak in hot, soapy water, then press a nylon brush or folded dishcloth from the safer side of the grater outward so the debris clears instead of packing in deeper.
The salted lemon method
I use lemon and salt for stainless graters that still feel greasy after soap. The acid helps cut the film left by cheese fat, and the salt gives a little extra grip without reaching for steel wool.
Use it like this:
- Cut a lemon in half
- Dip the cut side in salt
- Rub over the grating surface carefully
- Let it sit for a minute or two
- Rinse with very hot water
- Dry right away
This method is best for stainless steel. Skip it on graters with painted finishes, protective coatings, or exposed low-grade metal around the seams.
No lemon in the house
A baking soda paste works well for odor and discoloration. Mix a small amount with water, spread it on the problem area, wait a few minutes, then scrub gently with a soft brush and rinse clean.
A cut potato can also help with light surface rust on bare metal, but it is a backup option, not my first choice for kitchen tools.
About rust spots
Light orange spotting usually shows up where water sat too long, especially at seams, rivets, or the base of an older box grater. Clean off all food residue first so you can see whether you are dealing with surface rust or metal that is starting to fail.
If the rust is minor, a paste of baking soda and water or a careful rub with lemon can lift it. If you are dealing with rust on other kitchen surfaces too, this guide on how to remove rust stains is useful. If the metal is pitted, flaking, or rough enough to catch on a towel, replace the grater. Once the surface breaks down, it is no longer a tool worth saving.
Lingering odor usually means residue is still trapped in the teeth or around a handle joint. Wash again with hot, soapy water, rinse well, and dry fully before putting it away.
Good judgment beats stubbornness: If the surface is rough, flaking, or coated material is peeling, stop using the grater for food prep.
When It's More Than Just a Grater Let the Pros Handle It
You finish scrubbing the grater, look up, and realize the main job is still waiting. Grease on the cabinet fronts. Dust stuck along the baseboards. Film on the stove hood. A bathroom that needs more than a quick wipe. That is usually the point where a one-tool cleaning win stops feeling like enough.
A deep clean makes sense when the whole kitchen is asking for attention, not just the grater in the sink. I see this a lot. Homeowners and renters stay on top of daily tidying, but the detail work keeps slipping because it takes time, tools, and patience. Property managers run into the same problem between tenants. The space may look decent at first glance, yet the buildup is sitting in all the places people touch and notice.
In Reno and Sparks, that work stacks up fast. Fine dust, pollen, ash, and tracked-in grit settle on horizontal surfaces and floors almost as soon as you finish a basic clean. If the kitchen already has grease near the range and crumbs working their way into corners, a standard tidy-up rarely feels like a true reset.
What's included in a deep clean
If you are comparing deep cleaning Reno NV services, ask for a clear task list. Good deep cleaning is specific.
- Bathrooms. Toilets, sinks, tubs, showers, counters, mirrors, and detail wiping
- Kitchen degrease. Countertops, exterior cabinet fronts, appliance exteriors, and sink area
- Floors. Vacuuming and mopping
- Baseboards. Dust and buildup removal
- Dust removal. Surfaces, vents, ledges, and reachable fixtures
- Mirrors. Cleaned and polished
- High-touch disinfecting. Switches, handles, and frequently touched areas
Optional add-ons
- Inside oven
- Inside fridge
- Inside cabinets
- Wall spot cleaning
- Pet hair focus areas
Schedule. Clean. Inspect. Enjoy.
The process should be easy to follow before you book.
- Schedule. Book online or call, choose your service, and share any access notes
- Clean. Cleaners arrive with supplies and work from a checklist
- Inspect. A quick quality check catches missed details
- Enjoy. You come back to a home that feels reset and easier to maintain
Typical price range
Most cleans range from $250 to $600 depending on size, condition, and add-ons.
A few practical questions
How long does it take?
That depends on the size of the home, the level of buildup, and whether you add jobs like oven or fridge cleaning. Detail work takes time. That is the whole point of booking a deep clean.
Are supplies included?
Yes. Professional cleaners should bring their own supplies and equipment unless you request a specific product.
Can you work around pets?
Yes, if you share clear notes ahead of time. Gates, nervous pets, and rooms that need to stay closed are all worth mentioning.
What about Reno dust and ash?
Local crews know those conditions are part of the job. Homes near busier roads, open land, or smoky conditions often need extra attention on sills, vents, floors, and other flat surfaces.
Cleaning a cheese grater well is satisfying because it solves an annoying little problem the right way. A professional deep clean does the same thing for the rest of the house. It handles the grime that keeps nagging at you, saves your energy for the parts of home life that matter more, and leaves the kitchen feeling clean instead of temporarily under control.
Enjoy a Sparkling Kitchen Every Day
A cheese grater does not need to be the tool that beats you. Rinse early, soak properly, scrub with the right brush, and treat coated surfaces gently. For dried-on mess, the lemon method is often the fastest rescue.
If the grater is clean but the kitchen still feels like work, that is usually the sign to stop piecemealing the job. If you are ready for deep cleaning Reno NV, professional help can reset the whole space in one visit.
Book your cleaning with Altitude Cleaning Crew - your trusted deep cleaning Reno NV provider in Reno. Call 775-376-5527 or book online - http://altitudecleaningcrew.fieldd.co/
Flat-Rate House Cleaning Services You Can Count On
From downtown Reno apartments to family homes across Sparks, our team delivers reliable, professional house cleaning you can count on.